前端路由原理
发布时间 :
阅读 :
底层核心原理
- 在History路由模式下,均机遇html5新增的history API, pushState,replaceState,用法如下:
1
2
| history.pushState(state, title, url);
history.replaceState(state, title, url);
|
即跳转到URL路径(与当前页面在同一个域,形如一个网站的loaction.pathname部分),指定新页面的标题title,但是浏览器目前都忽略这个值,因此这里一般使用null,state为关联新地址的状态对象。
二者异同点:
pushState会增加一条浏览记录,而replaceState会替换当前历史记录。
两者均不会刷新当前页面,也不会发生真正的跳转。而是仅仅改变了地址栏URL
- 在Hash路由模式下,基于location.hash = pathStr来改变网站路径。pathStr代表网址中#号后面直到search的部分。与history不同的是,如果两次赋值一样的时候,并不会触发hashchange和popstate方法。
vue-router
- vue-router实现相对没有那么难理解。首先从使用方式入手,在vue实例初始化时候,会注入路由的router模块:
1
2
3
4
5
6
7
8
9
10
11
12
| import Vue from 'vue';
import router from './router/index';
new Vue({
el: '#app',
router,
store,
components: { App },
template: '<App/>'
});
|
- 在根vue组件,可以看到router-view和router-link两种使用方法
1
2
3
4
5
6
7
8
9
10
11
12
13
14
15
16
17
18
| <template>
<div id="app">
<div class="header">
<router-link to="/">Home</router-link>
<router-link to="/about">About</router-link>
<router-link to="/login">Login</router-link>
</div>
<router-view></router-view>
</div>
</template>
|
紧接着看下路由实例的声明:
1
2
3
4
5
6
7
8
9
10
11
12
13
14
15
16
17
18
19
20
21
22
23
24
25
26
27
28
29
30
31
32
33
34
35
36
37
38
39
40
41
42
43
44
45
46
47
48
49
50
51
52
53
54
55
56
57
58
59
60
61
62
63
| import Vue from 'vue';
import VueRouter from 'vue-router';
import routes from './routers';
Vue.use(VueRouter);
const router = new VueRouter({
routes
});
router.beforeEach((to, from, next) => {
next();
});
router.afterEach((to, from) => {
console.log('from:', from);
setTitle(to, router.app);
window.scrollTo(0, 0);
});
export default router;
|
- 项目中还需要定义路由和路由组件的关系,进阶还可以配置异步路由组件:
1
2
3
4
5
6
7
8
9
10
11
12
13
14
15
16
17
18
19
20
21
22
23
24
25
26
27
28
29
30
31
32
33
34
35
36
37
38
39
40
41
42
43
44
45
46
47
48
| const About = () => import('../views/About.vue');
const Bar = { template: '<div>bar</div>' };
export default [
{
path: '/',
name: 'home',
meta: {
title: '首页'
},
component: () => import( '../views/Home.vue')
},
{
path: '/test',
name: 'test',
title: 'test',
meta: {
title: '测试页面'
},
component: () => {
import('../views/Home.vue');
}
},
{
path: '/about',
meta: {
title: '首页'
},
component: About
},
{
path: '/bar',
meta: {
title: '首页'
},
component: Bar
},
{
path: '/login',
meta: {
title: '登录'
},
component: () => import( '../components/login.vue')
}
];
|
以上我们就完成了从路由表、路由组件的配置,到vue实例的路由注入,再加上vue组件使用路由的整个初始化过程。
路由源码浅析
Vue.use方法接收了一个install方法的对象或者类作为参数,例如注入一个全局的modal组件:
1
2
3
4
5
6
7
8
9
10
| import Modal from './modal.vue';
const MyModal = {
install(Vue){
Vue.component('Modal', Modal);
}
}
Vue.use(MyModal);
|
同理这种思路,沿袭到VueRouter根文件中:
1
2
3
4
5
6
7
| import { install } from './install'
...
export default class VueRouter {
static install: () => void
...
}
VueRouter.install = install
|
继续追溯到install.js:
1
2
3
4
5
6
7
8
9
10
11
12
13
14
15
16
17
18
19
20
21
22
23
24
25
26
| import View from './components/view'
import Link from './components/link'
export function install(Vue) {
...
Vue.mixin({
beforeCreate() {
Vue.util.defineReactive(this, '_route', this._router.history.current)
},
destroyed() {}
})
}
...
Object.defineProperty(Vue.prototype, '$router', {
get () { return this._routerRoot._router }
})
Object.defineProperty(Vue.prototype, '$route', {
get () { return this._routerRoot._route }
})
Vue.component('RouterView', View)
Vue.component('RouterLink', Link)
}
|
不难得出结论,vue-router 是Vue 应用的一个全局组件,一次注册便可以处处使用,且所有的vue 实例都能访问到Vue 原型对象上的$router 和$route 对象,因此在使用函数式跳转时是及其方便的。
那我们继续,在实例化VueRouter 时,有routes 和mode 参数
1
2
3
4
| const router = new VueRouter({
mode: 'history',
routes: []
})
|
进入构造器constuctor:
1
2
3
4
5
6
7
8
9
10
11
12
13
14
15
16
17
18
19
| constructor (options: RouterOptions = {}) {
...
this.fallback =
mode === 'history' && !supportsPushState && options.fallback !== false
if (this.fallback) {
mode = 'hash'
}
switch (mode) {
case 'history':
this.history = new HTML5History(this, options.base)
break
case 'hash':
this.history = new HashHistory(this, options.base, this.fallback)
break
case 'abstract':
this.history = new AbstractHistory(this, options.base)
break
}
}
|
可以看出,基于三种mode,vue-router 分别用三个对象来初始化this.history:HTML5History,HashHistory,AbstractHistory。而后续的几类路由跳转(go, push…)方法,也是调用了this.history 的方法。具体可以再挖掘vue router源代码,在这里就不过多的贴出了。
react-router
写法和vue比较类似,先给出一段初始化执行代码:
1
2
3
4
5
6
7
8
9
10
11
12
13
14
15
16
17
18
19
20
21
22
23
24
25
26
27
28
29
30
31
| import React from 'react';
import ReactDOM from 'react-dom';
import './index.css';
import App from './App';
import { Router, Route } from 'react-router';
import { createBrowserHistory } from 'history';
import Home from './views/Home';
import About from './views/About';
const history = createBrowserHistory();
ReactDOM.render(
<Router history={history}>
<App>
<Route path="/home" component={Home}/>
<Route path="/about" component={About} />
<Route path="/xxx" component={
props => {
return
<App1>
<Route path="子路由">
</App1>
}
}/>
</App>
</Router>,
document.getElementById('root');
);
|
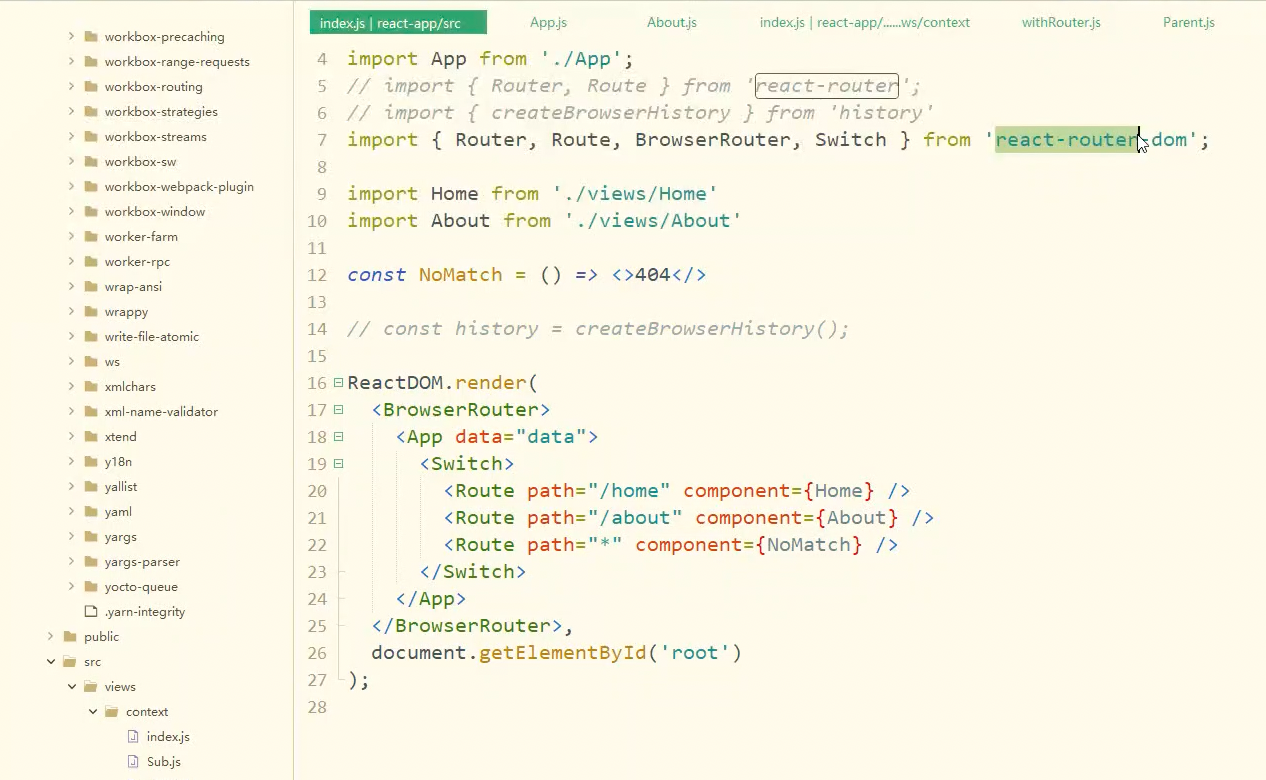
也可以参考这个,一个完整的路由组件用法,可以参考这个贴图:
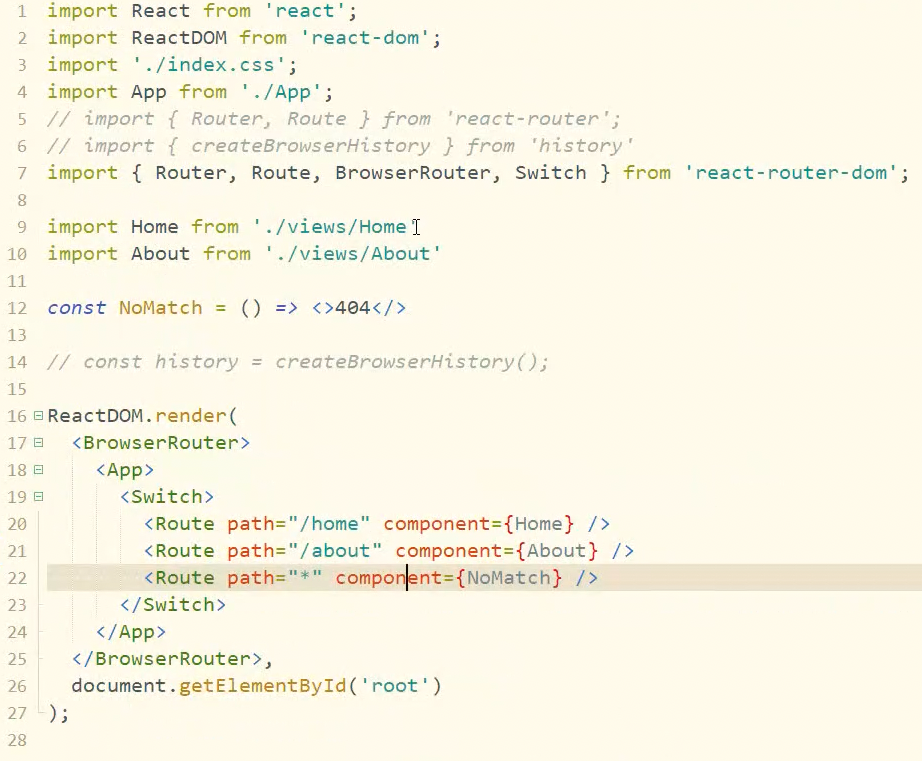
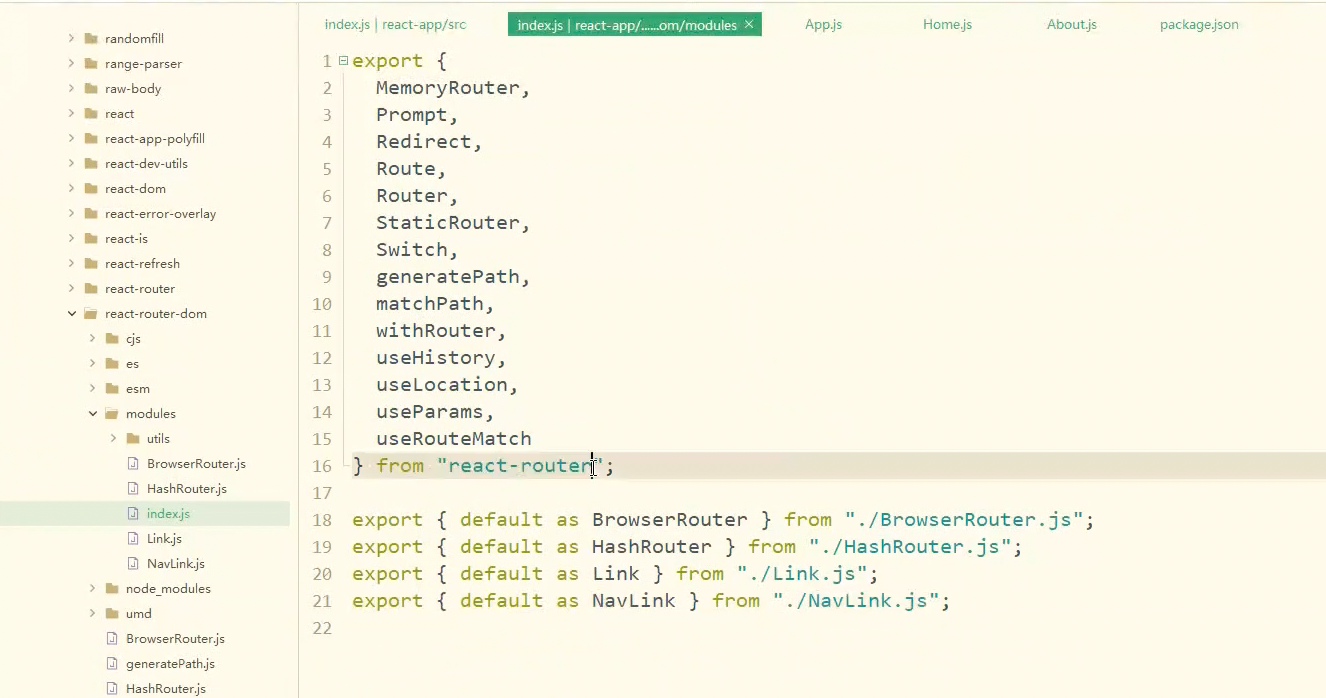
按照惯例,分析下react router的源码,router入口文件:
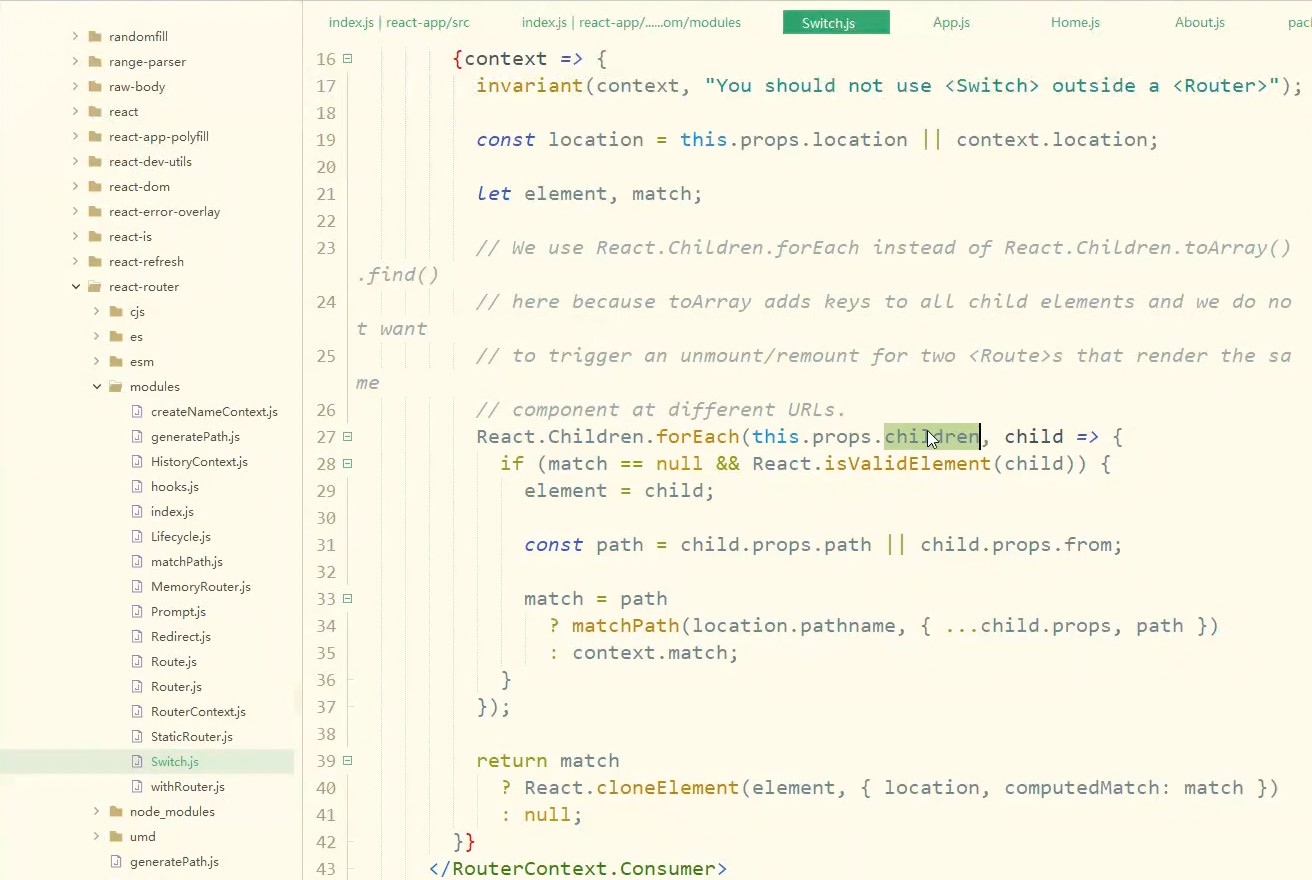
接下来看下switch.js路由匹配的方式。通过遍历React.Children,如果child路由合法,那么就构造返回一个element
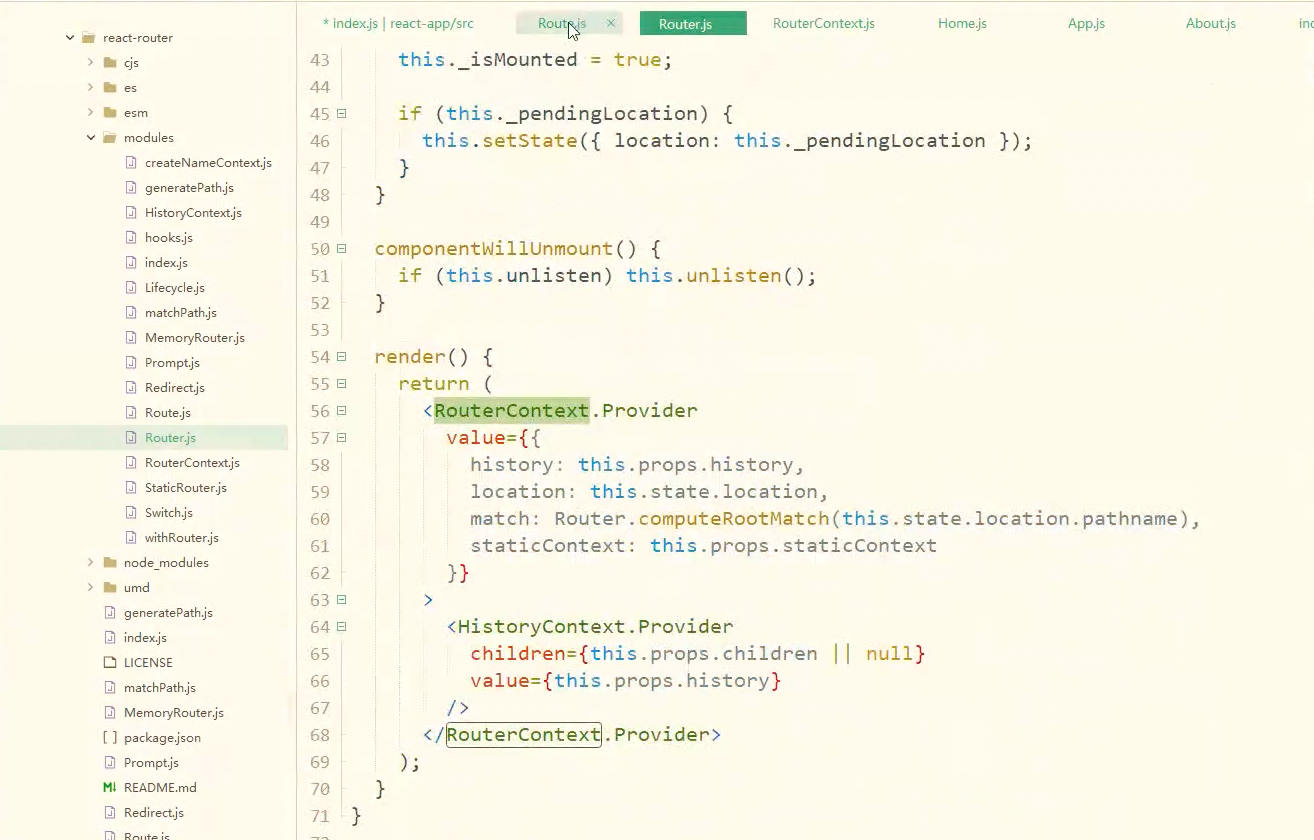
上面提到过,在路由switch.js,提供了一个RouterContext。这个可以理解为一个闭包上下文环境,引用环境的provider可以向consumer提供指定的数据和方法。那我们看看源码是如何呈现的:
在react Router.js中,像环境提供了一些公共的实例,比如history,location等等。其中history的push方法可以完成前端路由的跳转,以及通过state传值给子组件。
而在Route.js中,作为consumer方,直接在context中获取传递的history使用:
那么此时,我们如果想利用context这个方法,来完成Router Context props的传递,该如何做呢?首先完善代码,使用BrowserRouter和Switch:
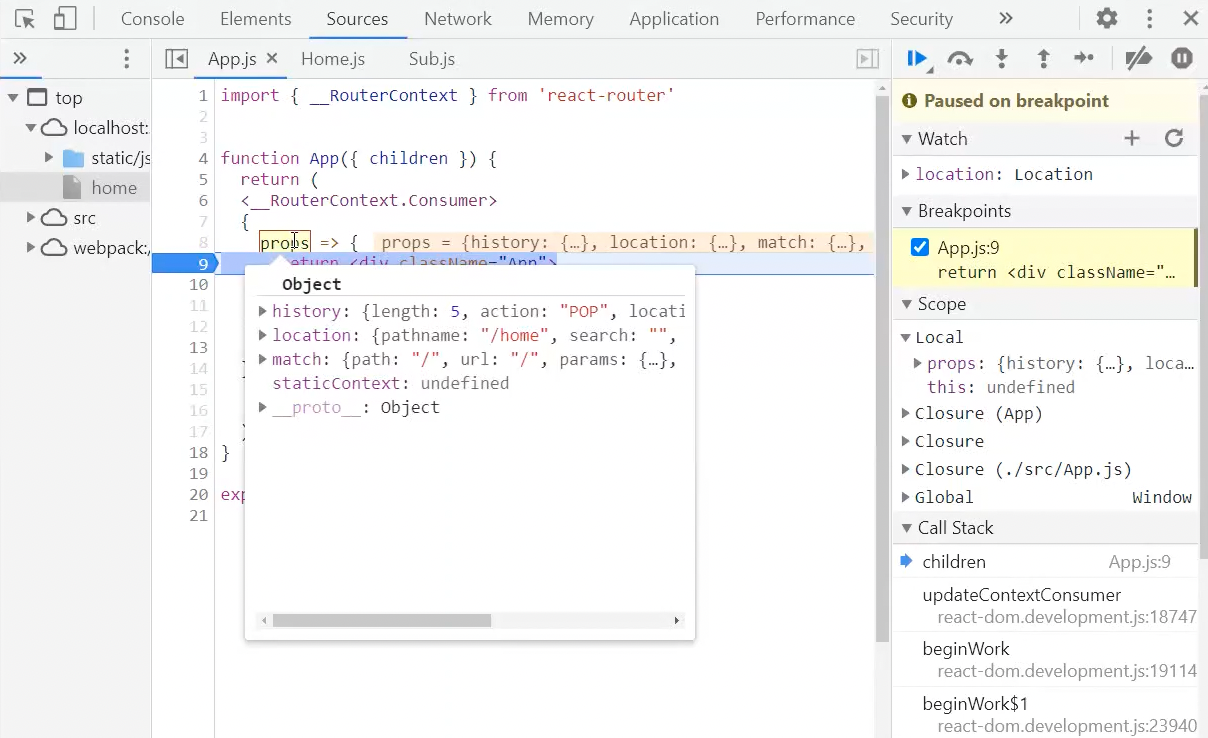
那么回到App.js,核心在于接受router context的传入,下面给出高阶函数的写法:
1
2
3
4
5
6
7
8
9
10
11
12
13
14
15
16
17
18
19
20
21
| import { __RouterContext } from 'react-router';
function App({children}) {
return (
<div className="App">
{ children }
</div>
);
}
function ctx(Component) {
return props =>
<__RouterContext.Consumer>
{ // context为router context环境提供的
context => <Component {...context}{...props}></Component>
}
</__RouterContext.Consumer>
}
export default ctx(App);
|
跑一下代码,就可以看到注入效果了:
转载请注明来源,欢迎对文章中的引用来源进行考证,欢迎指出任何有错误或不够清晰的表达。可以在下面评论区评论,也可以邮件至 miaozixiong@gmail.com

